All great ideas start with Pinterest. Once again, I was scrolling through my feed and I saw "the one". It was the perfect headboard; large-and-in-charge, rustic, and it opened to reveal a gun safe! I HAD to have it. I asked (begged) my dad to build me a headboard like the one I had found. Dad is always first pick; not only does my dad give me a great price (free), he is an amazing craftsman, and it makes the pieces that much more special that my dad built them especially for me!
I showed my dad a picture of the headboard and he and J's dad began to come up with their version of a gunsafe/headboard. How lucky are we to have families that get along so well?! They let me help pick out the pieces of wood that they would use. The wood is pecan and I chose pieces with cool knots, and some really interesting wormholes to give some unique character. They constructed the headboard so that the columns can be removed from the box for easy moving...this thing is massive! The gun-rack that's stowed away inside of the headboard is actually a rack that J's Grandpa owned years ago. How about that for some character and history? Poppa also insisted on the slight "eyebrow" arch as he calls it. He convinced me a square box doesn't show off his craftsmanship and it wouldn't look quite finished, obviously he knows his thang.
I showed my dad a picture of the headboard and he and J's dad began to come up with their version of a gunsafe/headboard. How lucky are we to have families that get along so well?! They let me help pick out the pieces of wood that they would use. The wood is pecan and I chose pieces with cool knots, and some really interesting wormholes to give some unique character. They constructed the headboard so that the columns can be removed from the box for easy moving...this thing is massive! The gun-rack that's stowed away inside of the headboard is actually a rack that J's Grandpa owned years ago. How about that for some character and history? Poppa also insisted on the slight "eyebrow" arch as he calls it. He convinced me a square box doesn't show off his craftsmanship and it wouldn't look quite finished, obviously he knows his thang.
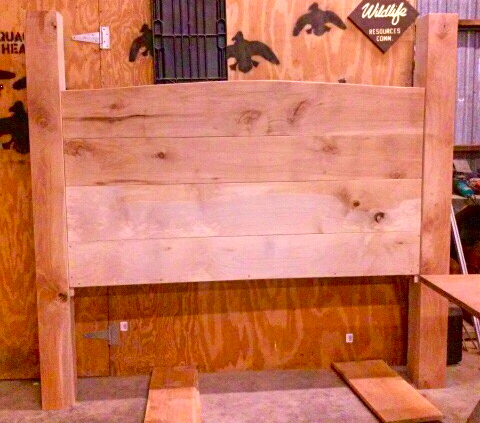
Headboard before stain
| The picture to the left is the headboard before the stain. I tested a few different stains but I chose another Pinterest project' the ol' steel wool and vinegar stain, which I will explain to y'all. You will need: - Unsweet Tea - White Distilled Vinegar - Steel Wool The first thing to do is mix your vinegar and wool. I ripped up 2 steel wool pads and poured a 1/2 gallon of distilled white vinegar over top of the wool into a sealable container. You then let that mixture set for |
| 24 hours. Many of the tutorials I read used tea to bring out the "tannins" in the wood, so I followed that idea. In hindsight the tea doesn't do anything except "water pop" the wood. Water popping is a method used to open the grains through applying moisture so the stain will sink deeper. For hard wood, like pecan, it is a good way to try to deepen the stain, but adding water to the wood can blur the grain lines. I'm not an expert but for more information google is always a good option! First, you will apply your tea and let that dry. After that has dried and your vinegar/wool mixture | 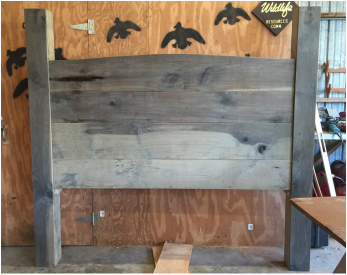
After the steel wool and vinegar stain
|
has sat for 24 hours you will rub in the vinegar and wool. We used a foam brush to paint on the stain and then an old rag to rub it in good and get a more even coverage. You will start to see the wood change in about 15 minutes, so stinkin' quick it's crazy! As you can see the stain affected the red parts of wood much more than it affected the white sections. The knots and wormholes that I love got a lot of attention turning almost black. I loved the effect it gave the wood I feel that it is very unique! I am in love and can't wait to post pictures of our decorated bedroom once we get settled into our new home.

 RSS Feed
